
"project macaron"
Saturday, March 12, 2011So, like what I've mentioned in my previous post, I tried my hand at making macarons and it was a success! :D
Could still handle a little fine-tuning but it's a bigger success compared to my first batch. It's a huge leap from my ugly, pock-marked ones. So I'm pretty darn pleased with myself today.

My ganache did not turn out as nice as I had hoped for, but I'm very pleased that my shells achieved the 'feet' it requires to be able to call it a macaron. That's the spongey part beneath the smooth shell.
And as always, I'd like to share the macaron recipe, adapted from the amazing Tartelette.
It's not an easy task and it takes at least two-thirds of your day, but the results are worth it. :) I have noticed a lot of mistakes I made from my first attempt and I have inserted a few tips that I picked up and learnt from. Follow them well and you will not have to go through any ugly macarons, ever. (Please pay extra attention to all italicised notes)
Basic French Meringue Macaron Batter (the macaron shells)
INGREDIENTS
100g egg whites (about 3 medium eggs)
25g granulated sugar (I used castor sugar instead as they're more fine)
200g powdered sugar
110g almonds (I used the ground almonds, purchased directly from the shop)
*Please make sure that all ingredients are at room temperature before you begin.
Combine the almond powder (if you use whole almonds, grind them in a food processor) with the powdered sugar. Sift everything and make sure they are mixed well.
*It is VERY important to sift these well to removed any large chunks of almond or balled up sugar. I skipped this step the first time and my failed macarons had sugar balls scattered all around. Not very tasty. So SIFT everything and really mix them well.
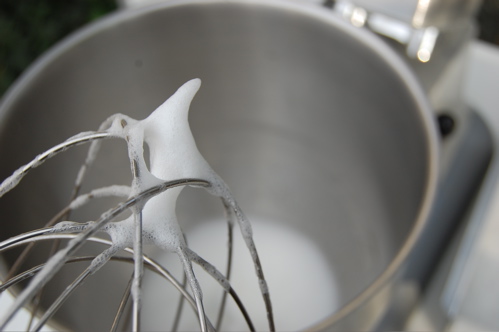
Put your egg whites in a mixer bowl. (Make sure your eggs have been aged at least 2 to 5 days before use. Separate them from the yolks in a bowl and keep them covered in the fridge for within that time frame to age them). With a hand mixer with whisk attachments, whisk your eggs at medium speed until they are a whiteish foam which holds soft peaks, as shown below.
Then, add in the granulated/castor sugar and beat until you get a glossy meringue, which holds stiffer peaks. Remember, this is important so that your macaron will form better. I got this wrong the first time which led to my failed macaron.
Next, get your sifted almond and powdered sugar mixture and pour half of it into the meringue. Start to mix everything in quick strokes, and then add in the rest of the powdered mixture and fold it in. This is one of the more crucial processes which will make or break your macarons.
*For the mixing process, or what they call the 'macaronnage', you should fold the powdered ingredients in by holding the bowl in one hand, and use your spatula (or mixing spoon) in the other hand to scoop everything in a circular motion and fold it into the middle of the mixture. That's one fold. The trick is to not fold more than 50 times. I made sure I folded at least 20 - 30 folds.
So you fold your mixture until you achieve a magma-like texture.
What do I mean by 'magma-like'?
It's when your mixture is not too runny or watery, and flows slowly like magma from an erupted volcano. When you lift your spatula, the mixture should drop back into the bowl in a ribbon-like pattern. Another way to test this is to drop a little dollop onto a flat plate. If the mixture flattens out on it's own, then it's good to go.
Place your pastry bag into a tall glass (to make it easier for you to fill it) and pour your mixture into it. If you're using a disposable bag like I did, use a piping tip. Macaron makers would suggest an Ateco #807 or #809 tip, but I used an #805 because that's the biggest one I had. All of it works the same way, the bigger your tip is, the bigger your macaron can be. Make sure you get all your mixture into the bag, and it's ready to be piped out.
Lay your parchment paper (baking sheet) onto your baking tray. For first timers at piping (like I am), it would help to have a guide below your parchment paper to help you visualize the size of the macaron that you will be piping out. I made mine a standard 3.8cm (1.5 inch) in diameter. You can either draw circles on the underside of your paper to help you, or you could use a pre-printed guide sheet like I did.

You can download the template above from here.
Once you have piped out your macarons, leave them to sit for ONE HOUR. You can leave it longer than that but it has to be at least an hour. This is to allow your macarons to harden the shells a little so that the top will come out nice and smooth and they will develop the required 'feet'.
*The first time I left it out for only about 30 minutes (as some recipes states that 30 minutes will do) but really, one hour is your best bet.

After an hour, preheat your oven to a temperature between 280ºF - 300ºF (137ºC - 148ºC).
*I used 145ºC, but as all ovens are different, you should probably test a batch before your proceed. Remember to use the 'upper-lower' setting if your oven has that.
Pop your macarons in and bake for about 15-18 minutes depending on their size. Again, if you piped your macarons to the 1.5inch diameter ones like mine, you can bake them for just 15 minutes.
Check on your macarons periodically. I had my nose pressed up against the oven door as I waited anxiously to see how they will turn out. You can imagine my delight when I saw the 'feet' forming after the first 5 minutes. I was practically dancing around my kitchen, screaming for joy. My first batch didn't have feet, so this was my first batch with feet. And I had feet for the following batches too so, yay. :D

My happy feet. :)
Let your macarons cool completely before trying to get them off the parchment paper. Chances are, they might crack, even if you exert just a little bit of force. If you're lucky, they will peel off easily. No such luck for me. What I did was to turn the parchment paper upside-down and with some water, i dabbed them onto the back, on the paper and slowly peeled from there.
*Peel the paper off the macarons, NOT peel the macarons off the paper. Dab water on the underside with your fingers and wait for about 10 seconds before you start peeling it off. Don't use too much water or leave it damp for too long otherwise the macarons will become soggy. Which means you gotta dab and peel them off, one-by-one on the go.
If you dont plan to use your macaron shells today, keep them in an airtight container in the freezer for up to one week. Now that the difficult part is over, time to make the ganache (or any other sort of filling that you'd prefer).
White Chocolate Raspberry Ganache
INGREDIENTS
1 1/2 cup white chocolate
1/2 cup heavy cream (which can be substituted with whipping cream)
1/3 cup raspberry jam
Heat the cream until hot. Drop the chocolate and jam into the cream and stir until all are melted and equally mixed. Pour it into a ceramic bowl and let it cool until firm enough to be piped or spooned onto the macaron shells.

Remember to match your macaron shells according to their equivalent sizes (because we're not perfect, not all macaron shells will be the same size) before you add the filling. Sandwich them gently and there you have it, a macaron.

I made 10 macarons in total today since I burnt my last batch. It had been a good, but frustratingly stressful experience but I'm planning to experiment on more flavors and colors. Lots of tuning up to do, some people think this is overly sweet so perhaps I will make a bittersweet toffee ganache instead to offset the sweetness.

Until then, have a go and let me know if this recipe works out for you.
Cheers!
xxx


3 comments
whee! Congrats on ur first success in macaroons!
ReplyDeleteMade me wanna make them again :S
next time try colour :) and a better filling heheheh!!
YAYYY
- CHELLE
@Chelle : Thanks babe! I am definitely gonna make them better and tastier! :)
ReplyDeletewhee! Congrats on ur first success in macaroons!
ReplyDeleteMade me wanna make them again :S
next time try colour :) and a better filling heheheh!!
YAYYY
- CHELLE
Say anything but please say what you mean.